

Jira Integration with Pixtel: Attach Screenshots Directly to Issues
Pixtel's Jira integration lets you push annotated screenshots and videos directly into Jira issues — new or existing — without leaving the application. This guide covers account setup, API token generation, issue creation (simple and advanced), and using default field configs to reduce repetitive work.
Watch the tutorial: https://www.youtube.com/embed/E_5YtcydbGc
Step 1: Set Up Your Jira Account in Pixtel
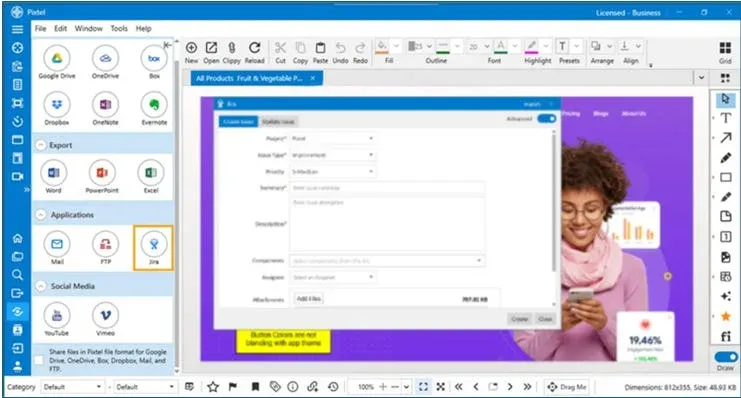
- Open a screenshot in Pixtel and annotate as needed
- Go to Home Bar → Share → Applications and click the Jira icon
- In the Jira Account Manager, click Add or Update
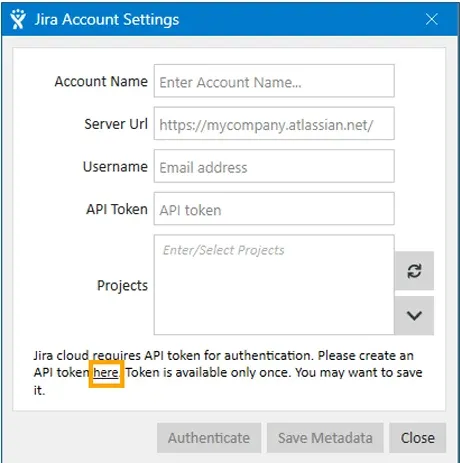
- Fill in your Jira instance URL and account details
- Click Authenticate — Pixtel loads your project metadata
- Select the projects you want available, then click Save Metadata
Step 2: Generate a Jira API Token
Pixtel uses an API token rather than your password for authentication:
- In the Jira Account Settings popup, click the "here" link — it opens Atlassian's token management page
- Generate a new token and copy it
- Paste it into the API Token field in Pixtel
- Save — the token won't be shown again, so store it securely
Step 3: Create a Jira Issue
Pixtel offers two modes for issue creation:
Simple Form
Best for quick tickets where you just need the basics:
- Fill in Summary, Description, Issue Type, and Project
- Works across all linked Jira projects
- Click Create — images upload in the background
Advanced Form
For project-specific fields pulled from Jira metadata:
- Toggle between Simple and Advanced using the switch button
- Fill in required and any custom fields specific to that project
- Use Default Field Config (see Step 5) to pre-fill recurring values
- Click Create — a confirmation with the Jira ticket link appears in the status bar
Step 4: Update an Existing Issue
To attach a screenshot to a ticket that already exists:
- Go to the Update Issue tab
- Search by Project, Status, Issue ID, Reporter, or keyword
- Apply filters to narrow results
- Select the issue from the dropdown
- Click Update — images and any comments are attached
Step 5: Set Default Field Configs
For fields that rarely change (Component, Environment, Reporter), save defaults to avoid filling them in every time:
- In Advanced Create mode, check Default Field Config
- Click the gear icon next to any field
- Choose a default value
- Fields auto-fill on all future issues — override any time
This is especially useful for teams that always file bugs against the same project, component, and environment.
Tips
Annotate before sharing. Add arrows, callouts, or highlights to the screenshot before opening the Share panel — the annotated version is what gets attached to the ticket.
Use Update Issue for follow-ups. When a bug gets reproduced or a new state needs documenting, use the Update Issue tab to attach the new screenshot to the existing Jira ticket rather than creating a duplicate.
Keyboard shortcut workflow. Assign a capture shortcut in User Preferences, capture the bug state, annotate, then push to Jira — the whole flow takes under 30 seconds once configured.
Related reading:
- Master Bug Reporting: Best Practices with Pixtel & Jira →
- How to Annotate Images in Pixtel →
- How to Share Captures Effortlessly with Pixtel →
Capture once and use it forever. It isn't just a tool — it's Pixtel.
'%3e%3cpath%20d='M6.49988%200.862305L0.380969%206.98121C-0.127315%207.4895%20-0.127315%208.31107%200.380969%208.81936C0.889253%209.32764%201.71083%209.32764%202.21911%208.81936L5.19992%205.83855V15.7C5.19992%2016.4176%205.781%2017%206.49988%2017C7.21875%2017%207.79984%2016.4176%207.79984%2015.7V5.83855L10.7806%208.81936C11.0341%209.07285%2011.3669%209.20024%2011.6997%209.20024C12.0325%209.20024%2012.3653%209.07285%2012.6188%208.81936C13.1271%208.31107%2013.1271%207.4895%2012.6188%206.98121L6.49988%200.862305Z'%20fill='white'/%3e%3c/g%3e%3cdefs%3e%3cclipPath%20id='clip0_1_2'%3e%3crect%20width='13.0002'%20height='16.8995'%20fill='white'%20transform='translate(-0.000244141%200.100533)'/%3e%3c/clipPath%3e%3c/defs%3e%3c/svg%3e)