

Mastering Scrolling Captures in Pixtel: A Complete Guide

Some of the most important content on your screen doesn't fit in a single frame.
A full-page error log. An entire Figma component library. A long API response in a debug console. A scrollable terms-of-service document you need to review. The standard screenshot captures what's visible — and stops there.
Pixtel's scrolling capture modes solve this by automatically capturing and stitching everything into one continuous, high-quality image. Here's how they work, and how to get the best results.
The Two Scrolling Capture Modes
Pixtel offers two distinct scrolling modes to cover different scenarios:
Scrolling Window — captures an entire scrollable application window (browser tab, document viewer, app panel) from top to bottom automatically. You select the window; Pixtel handles the rest.
Scrolling Region — lets you draw a bounding box around a specific scrollable area within a window. Useful when a page has sidebars, sticky headers, or other elements you want to exclude from the capture.
Step-by-Step: Creating a Scrolling Capture
1. Open the content you want to capture
Navigate to the web page, application, or document. Make sure it's scrolled to the very top before you start.
2. Launch Pixtel and select a scrolling mode
In Pixtel's capture menu, choose either Scrolling Window or Scrolling Region.
- With Scrolling Window: click on the target window. Pixtel will detect its scrollable boundaries automatically.
- With Scrolling Region: drag to draw a selection box over the scrollable area.
3. Pixtel auto-scrolls and captures
Once the region is selected, Pixtel takes over: it scrolls the content using Page Down key events, captures each viewport in sequence, and stitches the frames together using overlap-alignment algorithms that eliminate visible seams.
4. Edit in the canvas
After stitching, the long image opens in Pixtel's editing canvas. From here you can:
- Annotate with arrows, callout boxes, highlights, and sticky notes
- Crop to remove irrelevant sections
- Add vector shapes that remain re-editable later
5. Export or share
Save as PNG or JPEG, push directly to Jira, copy to clipboard, or export into a PPTX template. Pixtel also auto-organizes captures by the source application or website.
How the Stitching Works
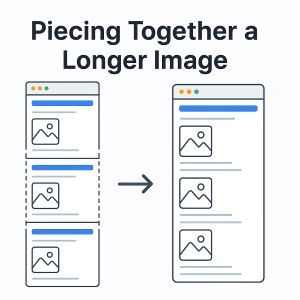
Understanding this helps you get cleaner results:
- Initial screenshot — captures the visible viewport at the starting position
- Auto-scroll — Pixtel scrolls the content by one viewport at a time using
Page Down - Overlap capture — each subsequent screenshot overlaps slightly with the previous one
- Alignment — proprietary algorithms match the overlapping regions to align frames precisely
- Composite output — all frames are merged into a single long image, exported as PNG or JPEG
The overlap-and-align approach handles pages where content shifts slightly during scroll (sticky elements, parallax backgrounds) much better than fixed-offset stitching.
Scrolling Capture In Action
Common Use Cases by Role
Developers & QA Engineers
- Document full console logs and stack traces in a single shareable image
- Capture complete app states for bug reports without truncating content
- Archive scrollable test results for QA review
Designers & UI/UX Professionals
- Capture entire responsive page layouts for stakeholder review
- Document full user flows without splitting across multiple files
- Screenshot long Figma frames or design specs end-to-end
Product & Business Analysts
- Capture full dashboard views, reports, or data tables
- Archive scrollable news articles, research pages, or competitor pages for reference
- Document lengthy policy or specification documents
Educators & Documentation Writers
- Screenshot entire tutorials or instructional sequences
- Capture full product documentation pages for offline review
Tips for Better Results
Scroll to the top before starting. Pixtel begins the capture at the current scroll position. Starting mid-page means you'll miss the content above.
Close sticky banners and cookie dialogs first. Elements that stay fixed at the top of the viewport will be repeated in every captured frame, creating duplicate strips in the stitched output.
Use Scrolling Region for complex layouts. If a page has a sticky navigation bar, floating widget, or sidebar that clutters the output, use Scrolling Region to target only the main content column.
Pause dynamic content. Carousels, auto-playing videos, and live data feeds that update during scrolling can introduce misaligned frames. Pause or freeze them before capturing.
Trim with the canvas editor. After stitching, use the crop tool to remove any header repetition or bottom padding before exporting.
Common Mistakes
| Mistake | What Happens | Fix |
|---|---|---|
| Starting mid-scroll | Top content is missing | Always scroll to top first |
| Leaving sticky elements active | Element repeats across frames | Dismiss cookie banners, hide fixed navbars |
| Capturing a full-width layout when you only need part | Output is cluttered | Use Scrolling Region instead of Scrolling Window |
| Exporting without reviewing | Stitching artifacts slip through | Always preview in the canvas before saving |
A Note on Long Outputs
Very long pages (e.g., a 50-section API reference) can produce images that are several thousand pixels tall. These are technically valid but impractical to share or review as a single file. For content this long, consider:
- Using Scrolling Region to capture only the relevant section
- Using Pixtel's tabbed workspace to break the content into logical sections across separate captures
- Exporting into a PPTX where each section becomes a slide
Related reading:
- Pixtel vs. Snipping Tool: Why Built-in Tools Fall Short →
- Master Bug Reporting: Best Practices with Pixtel & Jira →
- Unlocking Trapped Data: The Power of Advanced OCR →
Capture once and use it forever. It isn't just a tool — it's Pixtel.
'%3e%3cpath%20d='M6.49988%200.862305L0.380969%206.98121C-0.127315%207.4895%20-0.127315%208.31107%200.380969%208.81936C0.889253%209.32764%201.71083%209.32764%202.21911%208.81936L5.19992%205.83855V15.7C5.19992%2016.4176%205.781%2017%206.49988%2017C7.21875%2017%207.79984%2016.4176%207.79984%2015.7V5.83855L10.7806%208.81936C11.0341%209.07285%2011.3669%209.20024%2011.6997%209.20024C12.0325%209.20024%2012.3653%209.07285%2012.6188%208.81936C13.1271%208.31107%2013.1271%207.4895%2012.6188%206.98121L6.49988%200.862305Z'%20fill='white'/%3e%3c/g%3e%3cdefs%3e%3cclipPath%20id='clip0_1_2'%3e%3crect%20width='13.0002'%20height='16.8995'%20fill='white'%20transform='translate(-0.000244141%200.100533)'/%3e%3c/clipPath%3e%3c/defs%3e%3c/svg%3e)